Creating Messages

Contents
One of the most important aspects of sending a mailing is the message itself. Messages are created in the Mailing > Messages tab and are comprised of the elements describe below. These messages are delivered through mailings and campaigns executed on the Mailing > Mailings or Campaigns page.
The Message Page Elements
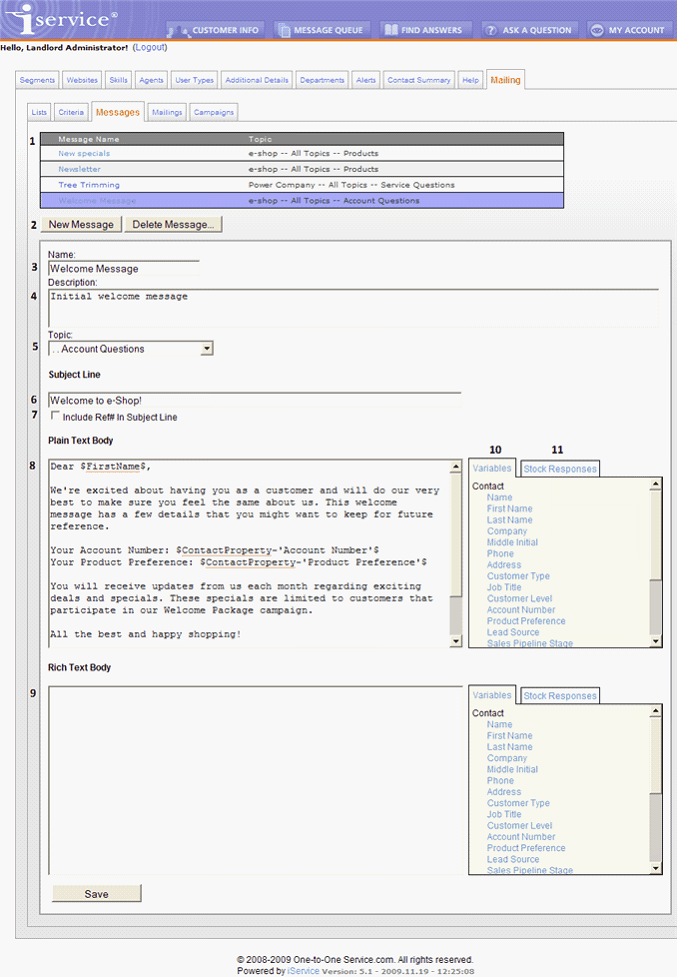
1. Message List. This is a list of all messages that are available to the agent for editing. Users of this page can only see messages in the Segments to which they have been granted access. The message’s segment is determined by its topic.
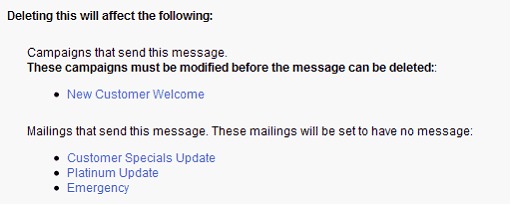
2. New Message / Delete Message. Use these buttons to create new messages or delete existing messages. When deleting a message, iService will display the Campaigns and Mailings in which the message is used, and prompt for confirmation. If the message is used in a Campaign or Mailing, they must first be removed before the message can be deleted.
3. Name. The name is a label that is displayed in the Message List and in other iService screens.
4. Description. This description is used to explain the purpose of the message.
5. Topic. All interactions within iService must have an assigned topic. This topic determines the Segment in which the message resides, which then determines agents that will have access to the message.
6. Subject Line. This is the subject line of the message that will be viewed by the recipient.
7. Include Ref# in Subject Line. This option will include the standard iService reference number in the subject line of the message. In some cases, the sender may not want the Ref# displayed in the subject line, especially if the message is personal or is not intended to receive a reply. The Ref# is used by iService to link any responses from the contact with the original outbound email. This association creates a message thread within interaction history that makes it easier to view the overall conversation with the contact.
Mailings are delivered as true multipart messages that include a text body and optional HTML body. This ensures that regardless of the recipient’s email client (cell phone, outlook, etc.), the message will be rendered properly. The HTML body is optional, but the plain text body is required for every message.
Note: You should never send an HTML only email, as it will be viewed as SPAM by most network providers. Also, some email clients are unable to render HTML and your message will not be viewable on their device (e.g., cell phone or some smart phone email clients).
8. Plain Text Body. The plain text body may include stock responses and variables, similar to composing responses from the Message Queue page. Stock responses are commonly used blocks of text and variables that simplify creating messages (such as the opening or closing for messages). All of the contact properties to which the agent has access may be used as variables when composing a message. Variables are inserted where the cursor is placed in the text box by clicking the variable name. Although listed in the Variable quick pick list, you can also type them directly such as $ContactProperty-'Job Title'$. Be sure to use a single quote around the actual property name instead of double quotes. Variables are described in detail within the iService Setup Guide using Auto Reponses section.
9. HTML Body. The HTML body section of the page functions the same as the Plain Text Body which is described above. The same variables and stock responses may be used in both areas, and the preview panel will display using your properties. The most common method for constructing the HTML body is to use an HTML editor such as Adobe Dreamweaver or Microsoft Expressions. For simple messages that include only basic markup, like font styles (e.g., bold, underline, etc.), the most common approach is to paste and edit the text version of the message.
10. Variables. To include variables in the message body, select them from this panel and they will be pasted into the message at the cursor location. The list of variables displayed is limited to the agent’s segment access. That is, if the agent would not normally see the contact properties in the Customer Info>Contacts>Details tab, they will not be displayed here.
11. Stock Responses. All of the stock responses available to the agent are displayed in this tab. To insert the stock response as a variable, click the stock response name. To insert the full text of the stock response, click the word “Text” to the right of the stock response. When “text” is selected, the corresponding version (Text or HTML) of the stock response will be inserted.