
Alerts may be created to monitor your iService site and take automated actions when conditions are met. They can be used to alert management when service levels have dropped, or can be configured to change the topic of messages that meet the specified conditions.
Creating Alerts – Step 1 (Frequency)
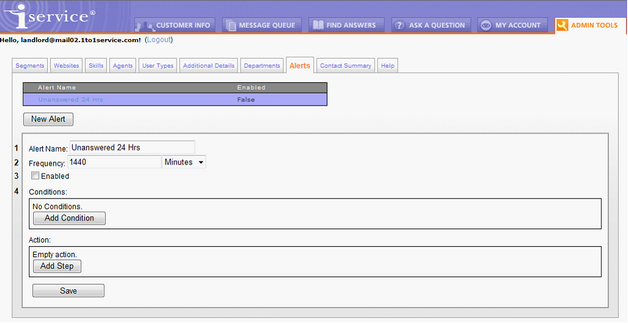
To create an alert, give it a unique name and set the frequency.
1 – Alert Name – This is the name that appears in the Alert list.
2 – Frequency – Specify the frequency with which the alert will process. For example, an alert with a frequency of 1 day will check for the conditions and perform the specified action once per day.
3 – Enabled - To enable the alert, check the Enabled check box.
4 – Conditions – After specifying the frequency, the conditions will be selected in Step 2.
Creating Alerts – Step 2 (Conditions)
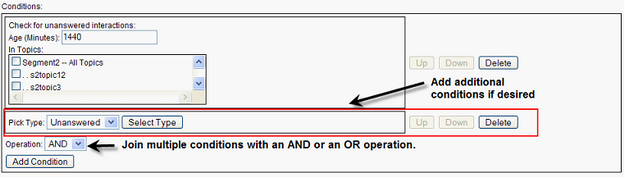
The second step when creating an alert is to specify the conditions in which the actions will apply. Clicking the Add Condition button allows an additional condition to be added via an AND or an OR; however, in release 4.12, the only condition is unanswered interaction, so adding additional conditions through this mechanism is currently not useful.
After selecting the condition type, define the details for the condition as shown below.
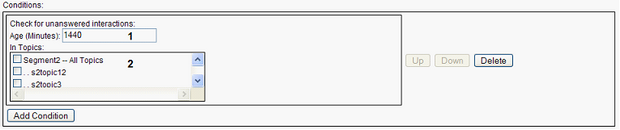
1 – Age – Specify the age of the unanswered interaction that will satisfy the condition.
2 – In Topics – Specify the topics to monitor for unanswered interactions. If no topics are selected, the Alert will apply to all topics of the tenant.
If multiple conditions are required, join them with the appropriate operation.
Creating Alerts – Step 3 (Actions)
The third step when creating an alert is to specify the actions that will be taken when the condition is met. There are three different actions that can be taken, and multiple actions may be specified: Change Topic, Select Agents, and Send Auto Response.

Change Topic – This will change the topic for messages that match the condition to the designated topic. Select the segment and desired topic.
Select Agents – Select a list of agents that should receive notification when the condition is met. The auto response is created in the Segment > Auto response page. This action must always be used with the Send Auto Response action.
Send Auto Response – This action generates the auto response sent to the selected agents. To send an Auto Response you must first select the action ‘Select Agents’ and specify the agents that should receive the notice. Then add the action Send Auto Response and complete the action as shown below.
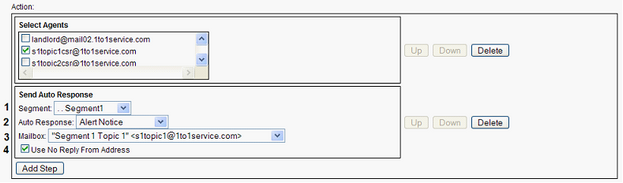
1 – Segment – Select the agent that contains the desired alert auto response template. Note that only Standard Segments contain mailboxes.
2 – Auto Response – After the segment is selected, a list of auto responses of type Alert will be displayed from that segment.
3 – Mailbox – A list of mailboxes from the selected segment will be displayed. Pick the mailbox that should send the notification.
4 – Use No Reply From Address - To send the response from no-reply@domain.com (where domain is the domain for the selected mailbox), check the Use No Reply From Address box